CSS3制作留言墙
放假期间一直在家陪儿子玩,好久没有动手更新W3CPLUS了,今天刚好有时间学习了一下CSS3制作的留言墙。说白点就是像便签纸一样的效果,只是贴在墙上,当然大家也可以想像成贴在别的地方,具体什么地方我就不多啰嗦了,直奔主题。
目标
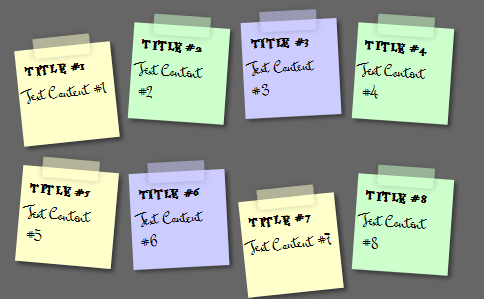
今天我们的目标很明确,也先清楚,就是使用css3的相关属性制作一个类似于留言墙的效果,如下面的demo所示:
HTML Markup
做任web页面效果,都少不了相对应的html结构,我们也不另外,不过这个实例相当的简单,就是一个无序列表“ul”,里面的内容大家可以根据自己的需求来写,我们此处是统一的“#1-#8”八个编号。
			<ul>
			  <li>
			    <a href="">
			      <h2>Title #1</h2>
			      <p>Text Content #1</p>
			    </a>
			  </li>
			  [...]
			  <li>
			    <a href="">
			      <h2>Title #8</h2>
			      <p>Text Content #8</p>
			    </a>
			  </li>
			</ul>
看到上面的html结构肯定有童学要骂我是误人子弟了——“怎么在a标签中嵌套块标签,不合规范呀”。按规范来说,这样是不标准,所以此处先声明,只是用在此处为了说明实例效果,大家在运用中可以根据自己的需求修改上面的html结构,或标签代码。此处仅供参考。
CSS Code
HTML结构没什么好看的,我们今天的关键是在于CSS样式这一块。制作上面的DEMO效果,使用了多个CSS3属性,较明显的:CSS3盒子阴影——box-shadow、CSS3变形——transform以及CSS3动画——transition,当然还使用了CSS3伪类选择器中的“:nth-child”和“:before”等等。下面我们就分几步来实现这个效果。
1、基本样式
			* {
			margin:0;
			padding:0
		}
		body {
			font-family:arial,sans-serif;
			font-size:100%;
			margin:3em 16em;
			background-color:#666;
			color: #fff;
		}
		h2,p {
			font-size: 100%;
			font-weight:normal;
		}
		ul,li {
			list-style:none;
		}
		ul {
			padding:3em;
			font-size:0;
		}
		ul li {
			/*让贴纸在按行显示,可以使用float实现效果*/
			display: inline-block;
			*display:inline;
			zoom:1;
			margin:1em 1em 3em;
			font-size:16px;
		}
		ul a {
			/*使用box-shadow制作阴影效果*/
			-moz-box-shadow: 5px 5px 7px rgba(33,33,33,0.7);
			-webkit-box-shadow: 5px 5px 7px rgba(33,33,33,0.7);
			box-shadow: 5px 5px 7px rgba(33,33,33,0.7);
			/*使用transform中的rotate制作旋转效果*/
			-webkit-transform:rotate(-6deg);
			-o-transform:rotate(-6deg);
			-moz-transform:rotate(-6deg);
			-ms-transform:rotate(-6deg);
			transform:rotate(-6deg);
			/*使用transition让transform属性变化更具生动性*/
			-moz-transition: -moz-transform .15s linear;
			-webkit-transition: -webkit-transform .15s linear;
			-o-transition: -o-transform .15s linear;
			-ms-transition: -ms-transform .15s linear;
			transition: transform .15s linear;
			/*为后面的胶纸效果设定一个参照值*/
			position:relative;
			/*实现一个四方形的标签纸效果*/
			display:inline-block;
			height:10em;
			width:10em;
			font-size:100%;
			text-decoration:none;
			color:#000;
			background-color:#ffc;
			padding:1em;
		}
		/*使用CSS3伪类选择器中的":before"制作胶纸效果*/
		ul a:before {
			content:'';
			position:absolute;
			top:-20px;
			left: 20%;
			width: 110px;
			height: 40px;
			background-color:rgba(255, 255, 204,0.5);
			border-left: 1px dashed rgba(0, 0, 0, 0.1);
			border-right: 1px dashed rgba(0, 0, 0, 0.1);
			-webkit-box-shadow: 0px 0px 12px rgba(0, 0, 0, 0.2);
			-moz-box-shadow: 0px 0px 12px rgba(0, 0, 0, 0.2);
			box-shadow: 0px 0px 12px rgba(0, 0, 0, 0.2);
		}
第一步我想大家能很容易的看懂,而且我在代码里做了具体的标注,每一部分代码起什么作用。这里只是另外提一下,制作标签纸的基本效果,我在此处主要使用了:CSS3盒子阴影——box-shadow、CSS3变形——transform、CSS3动画——transition以及CSS3伪类选择器。也就是前面所提到的几个属性。如果你对这几个属性不怎么了解,你可以点击相关的链接进入深一层的了解。
2、制作标签内容效果
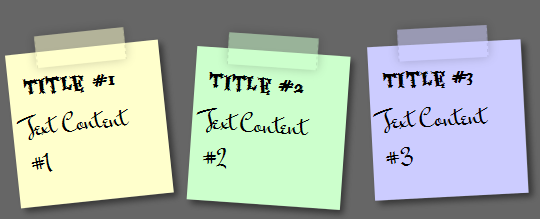
这里的标签内容,字体非常特殊,显示的效果也就特别的与众不同,如下图所示:

此时大家肯定会想到使用CSS3本地字体——@font-face来实现上图的特殊字体效果。但是除了这种方法以外,还有没有别的方法呢?回答当然是肯定的,前面我在《Google Font的运用》一文中也有介绍过。那么今天我们为了固定以前所学的知识,这里的实例我不采用“@font-face”而是采用“Google Font Api”。
使用Google Font Api制作特殊字体效果,需要通过这里得到下面的代码:
<link href='http://fonts.googleapis.com/css?family=Mr+Bedfort|Eater' rel='stylesheet' type='text/css' />
得到上面的代码后,我们还要将其运用到我们的实例中,才起作用。否则的话,得到了也是无用的。那么首先将上面的代码放下页面的“<head>”与“</head>”之间,并且在需要使用这个特殊字体的地方调用下面的代码:
			font-family: 'Eater',cursive;
			font-family: 'Mr Bedfort',cursive;
那么我们这个实例中分别运用在“h2”和“p”两个标签之中:
			ul p {
				font-family: 'Mr Bedfort', cursive;
				font-size:180%;
			}
			ul h2 {
				font-family: 'Eater', cursive;
				font-size: 140%;
				font-weight:bold;
				padding-bottom:10px;
				padding-top:5px;
			}
这样也在本地电脑上具有特殊字体的效果,就算是你的用户没有这些字体也能正常显示这些效果。如果你还不太了解,你不仿点点这里,我想你会明白的,也会喜欢的。
3、制作不同色彩和位置的标签效果
说实现在的,其实完成前面的两步,我们的效果基本上是出来了,那么这一步主要是为了增加一些别的效果,比如说:使其不在同一位置,不是同一风格。如下图所示:

看到上图,大家或许会想到给li标签加类名,其实不用的,我们完全可能使用CSS3伪类选择器中的“:nth-child”来实现,如此处的运用:
			/*给第2,4,6,8...2n处的标签改变旋转值和背景色*/
			ul li:nth-child(even) a {
				-webkit-transform:rotate(4deg);
				-o-transform:rotate(4deg);
				-moz-transform:rotate(4deg);
				-ms-transform:rotate(4deg);
				transform:rotate(4deg);
				position:relative;
				top:5px;
				background-color: #cfc;
			}
			/*给第3,6,9...3n处的标签改变旋转值和背景色*/
			ul li:nth-child(3n) a {
				-webkit-transform:rotate(-3deg);
				-o-transform:rotate(-3deg);
				-moz-transform:rotate(-3deg);
				-ms-transform:rotate(-3deg);
				transform:rotate(-3deg);
				position:relative;
				top:-5px;
				background-color: #ccf;
			}
			/*给第5,10,15...5n处的标签改变旋转值和背景色*/
			ul li:nth-child(5n) a {
				-webkit-transform:rotate(5deg);
				-o-transform:rotate(5deg);
				-moz-transform:rotate(5deg);
				-ms-transform:rotate(5deg);
				transform:rotate(5deg);
				position:relative;
				top:-10px;
			}
			/*改变对应的胶纸色*/
			ul li:nth-child(even) a:before {
				background-color:rgba(204, 255, 204,0.5);
			}

			ul li:nth-child(3n) a:before {
				background-color:  rgba(204, 204, 255,0.5);
			}
此时你可能又会纠结一个问题,为什么是“2n”、“3n”和“5n”?难道我不能使用“2n+1”、“4n”之类的吗?告诉大家,可以的,你只要让你值不为0和负数就OK,当然还需要能满足你的需求。我截了一个图让大家参考:
有关于“CSS3伪类选择器”的使用,要是大家感兴趣的话可以狠狠点击这里查看。
4、制作焦点状态下的效果
为了让效果更趋于完美,我们在增加一个“焦点”状态下的效果。
			ul li a:hover,
			ul li a:focus {
				/*改变阴影效果*/
				-moz-box-shadow: 10px 10px 7px rgba(0,0,0,0.7);
				-webkit-box-shadow: 10px 10px 7px rgba(0,0,0,0.7);
				box-shadow: 10px 10px 7px rgba(0,0,0,0.7);
				/*使用transform中的scale将便签纸放大*/
				-moz-transform: scale(1.25);
				-webkit-transform: scale(1.25);
				-o-transform: scale(1.25);
				-ms-transform: scale(1.25);
				transform: scale(1.25);
				position: relative;
				z-index:5;
			}
到此,前面预定的目标我们就算是完成了,最后我将所有的CSS Code统一列出:
			/*step1*/
			* {
				margin:0;
				padding:0
			}
			body {
				font-family:arial,sans-serif;
				font-size:100%;
				margin:3em 16em;
				background-color:#666;
				color: #fff;
			}
			h2,p {
				font-size: 100%;
				font-weight:normal;
			}
			ul,li {
				list-style:none;
			}
			ul {
				padding:3em;
				font-size:0;
			}
			ul li {
				/*让贴纸在按行显示,可以使用float实现效果*/
				display: inline-block;
				*display:inline;
				zoom:1;
				margin:1em 1em 3em;
				font-size:16px;
			}
			ul a {
				/*使用box-shadow制作阴影效果*/
				-moz-box-shadow: 5px 5px 7px rgba(33,33,33,0.7);
				-webkit-box-shadow: 5px 5px 7px rgba(33,33,33,0.7);
				box-shadow: 5px 5px 7px rgba(33,33,33,0.7);
				/*使用transform中的rotate制作旋转效果*/
				-webkit-transform:rotate(-6deg);
				-o-transform:rotate(-6deg);
				-moz-transform:rotate(-6deg);
				-ms-transform:rotate(-6deg);
				transform:rotate(-6deg);
				/*使用transition让transform属性变化更具生动性*/
				-moz-transition: -moz-transform .15s linear;
				-webkit-transition: -webkit-transform .15s linear;
				-o-transition: -o-transform .15s linear;
				-ms-transition: -ms-transform .15s linear;
				transition: transform .15s linear;
				/*为后面的胶纸效果设定一个参照值*/
				position:relative;
				/*实现一个四方形的标签纸效果*/
				display:inline-block;
				height:10em;
				width:10em;
				font-size:100%;
				text-decoration:none;
				color:#000;
				background-color:#ffc;
				padding:1em;
			}
			/*使用CSS3伪类选择器中的":before"制作胶纸效果*/
			ul a:before {
				content:'';
				position:absolute;
				top:-20px;
				left: 20%;
				width: 110px;
				height: 40px;
				background-color:rgba(255, 255, 204,0.5);
				border-left: 1px dashed rgba(0, 0, 0, 0.1);
				border-right: 1px dashed rgba(0, 0, 0, 0.1);
				-webkit-box-shadow: 0px 0px 12px rgba(0, 0, 0, 0.2);
				-moz-box-shadow: 0px 0px 12px rgba(0, 0, 0, 0.2);
				box-shadow: 0px 0px 12px rgba(0, 0, 0, 0.2);
			}
			/*step2*/
			ul p {
				font-family: 'Mr Bedfort', cursive;
				font-size:180%;
			}
			ul h2 {
				font-family: 'Eater', cursive;
				font-size: 140%;
				font-weight:bold;
				padding-bottom:10px;
				padding-top:5px;
			}
			/*step3*/
			/*给第2,4,6,8...2n处的标签改变旋转值和背景色*/
			ul li:nth-child(even) a {
				-webkit-transform:rotate(4deg);
				-o-transform:rotate(4deg);
				-moz-transform:rotate(4deg);
				-ms-transform:rotate(4deg);
				transform:rotate(4deg);
				position:relative;
				top:5px;
				background-color: #cfc;
			}
			/*给第3,6,9...3n处的标签改变旋转值和背景色*/
			ul li:nth-child(3n) a {
				-webkit-transform:rotate(-3deg);
				-o-transform:rotate(-3deg);
				-moz-transform:rotate(-3deg);
				-ms-transform:rotate(-3deg);
				transform:rotate(-3deg);
				position:relative;
				top:-5px;
				background-color: #ccf;
			}
			/*给第5,10,15...5n处的标签改变旋转值和背景色*/
			ul li:nth-child(5n) a {
				-webkit-transform:rotate(5deg);
				-o-transform:rotate(5deg);
				-moz-transform:rotate(5deg);
				-ms-transform:rotate(5deg);
				transform:rotate(5deg);
				position:relative;
				top:-10px;
			}
			/*改变对应的胶纸色*/
			ul li:nth-child(even) a:before {
				background-color:rgba(204, 255, 204,0.5);
			}

			ul li:nth-child(3n) a:before {
				background-color:  rgba(204, 204, 255,0.5);
			}
			/*step4*/
			ul li a:hover,
			ul li a:focus {
				/*改变阴影效果*/
				-moz-box-shadow: 10px 10px 7px rgba(0,0,0,0.7);
				-webkit-box-shadow: 10px 10px 7px rgba(0,0,0,0.7);
				box-shadow: 10px 10px 7px rgba(0,0,0,0.7);
				/*使用transform中的scale将便签纸放大*/
				-moz-transform: scale(1.25);
				-webkit-transform: scale(1.25);
				-o-transform: scale(1.25);
				-ms-transform: scale(1.25);
				transform: scale(1.25);
				position: relative;
				z-index:5;
			}
上面展示的是此例中运用到的所有CSS样式代码,不过大家千万不要忘记了第二步中的:
<link href='http://fonts.googleapis.com/css?family=Mr+Bedfort|Eater' rel='stylesheet' type='text/css' />
上面这段代码需要放置在“<head>”中,第二步的效果才会正常。
那么有关于CSS3制作留言墙的效果就到此结束了,希望能给大家带来一丝灵感,制作更好的效果。当然也希望大家喜欢这个案例。如果您有更好的想法,可以随时在下面的评论中给我留言。
如需转载烦请注明出处:W3CPLUS


