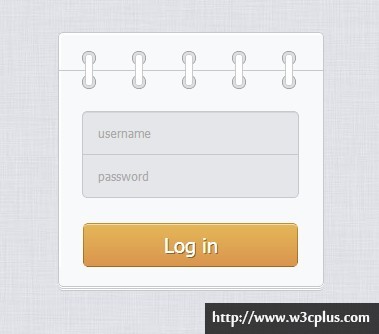
css3制作日历风格登陆表单
好久没有发布案例了,今天发布一个@白牙同学制作的登录表单,这个表单风格类似于日历。其中较为复杂的是登录表单的中链环效果。通过五个span标签,配合CSS3的伪类来制作。详细制作请查看Demo制作过程。
HTML结构
<div class="content">
  <!-- ===用来制作纸张层叠==== -->
  <div class="form-wrapper">
    <!-- ====制作链条效果=== -->
    <div class="linker">
      <!-- ==== 每个链条 ==== -->
      <span class="ring"></span>
      <span class="ring"></span>
      <span class="ring"></span>
      <span class="ring"></span>
      <span class="ring"></span>
    </div>
    <!-- ==== 登录表单 ==== -->
    <form class="login-form" action="#" method="post">
      <input type="text" name="username" placeholder="username" />
      <input type="password" name="password" placeholder="password" />
      <button type="submit">Log in</button>
    </form>
  </div>
</div>
这样的结构,对大家来说都很简单,基中“div.form-wrapper”主要用来实现表单纸张层叠效果。其中最为关键的是链条效果,这里使用了一个div加上5个span实现:
<!-- ====制作链条效果=== -->
    <div class="linker">
      <!-- ==== 每个链条 ==== -->
      <span class="ring"></span>
      <span class="ring"></span>
      <span class="ring"></span>
      <span class="ring"></span>
      <span class="ring"></span>
    </div>
CSS样式
下面分步来看实现的样式代码:
/*基本布局样式*/
body {
  background-image:url(bg.jpg);
}
.content {
  width:680px;
  height:320px;
  margin:50px auto;
}
/*表单容器样式,类似于日历风格*/
.form-wrapper {
  margin:32px auto;
  width:264px;
  height:253px;
  position:relative;
  border:1px solid rgb(197,200,204);
  background-color:rgb(248,249,250);
  text-align:center;
  border-radius:5px;/*圆角*/
  box-shadow:0 1px 0 rgb(255,255,255), 0 2px 0 rgb(197,200,204), 0 3px 0 rgb(255,255,255), 0 4px 0 rgb(197,200,204);/*纸张层叠效果*/
}
/*制作链条顶部背景区域*/
.form-wrapper:before {
  content:"";
  display:block;
  height:37px;
  border-bottom:1px solid rgb(197,200,204);
  border-radius:5px 5px 0 0;
  box-shadow:inset 2px 2px 0 rgb(255,255,255);
}
上面代码是一个关键之处,使用box-shadow的多阴影模仿制作多张纸层叠效果。
/*表单元素样式制作*/
.form-wrapper .login-form {
  padding-top:40px;
  box-shadow:inset 2px 0 0 rgb(255,255,255);/*内阴影*/
}
/*登录框样式*/
.form-wrapper input[name="username"],
.form-wrapper input[name="password"] {
  height:40px;
  width: 200px;
  margin:0 auto;
  padding-left:15px;
  display:block;
  border:1px solid rgb(197,200,204);
  background-color:rgb(228,230,233);
}
.form-wrapper input[name="username"]{
  border-bottom:none;
  border-radius:5px 5px 0 0;
  box-shadow:inset 0 1px 0 rgb(212,214,217);
}
.form-wrapper input[name="password"] {
  border-radius:0 0 5px 5px;
}
/*按钮效果*/
.form-wrapper button[type="submit"] {
    margin-top:25px;
    width:215px;
    height:44px;
    color:#fff;
    font-size:20px;
    border:none;
    border-top:1px solid rgb(190,143,48);
    position:relative;
    /*利用双背景制作垂直渐变色边框*/
    background:-*-linear-gradient(top,rgb(228,182,88),rgb(218,149,78)) 1px 1px no-repeat,
               -*-linear-gradient(top,rgb(190,143,48),rgb(160,106,32)) left top no-repeat;
    background-size:213px 41px,215px 43px;
    border-radius:5px;
    box-shadow:inset 0 1px 0 rgb(242,220,175);
    text-shadow:1px 1px 0 rgb(138,100,50);
    transition:color 300ms linear;
}
.form-wrapper button[type="submit"]:hover {
    color:rgb(195,188,81);
    background:-*-linear-gradient(top,rgb(195,99,81),rgb(196,84,64)) 1px 1px no-repeat,
               -*-linear-gradient(top,rgb(190,143,48),rgb(160,106,32)) left top no-repeat;
}
上面这段代码主要是用来制作表单元素的样式。
/*日历链条和环的制作*/
.form-wrapper .linker {
  position:absolute;
  width:240px;
  height:40px;
  top:18px;
  left:10px;
}
/*上环*/
.linker .ring {
  position:relative;
  display:inline-block;
  border:1px solid rgb(163,164,167);
  background-color:rgb(220,222,225);
  height:12px;
  width:12px;
  border-radius: 6px;
  margin-right:33px;
}
.linker .ring:last-child {
  margin-right:0;
}
/*下环*/
.linker .ring:before {
  content:"";
  position:absolute;
  bottom:-25px;
  left:-1px;
  border:1px solid rgb(163,164,167);
  background-color:rgb(220,222,225);
  height:12px;
  width:12px;
  border-radius: 6px;
}
/*中间链条*/
.linker .ring:after{
  content:"";
  position:absolute;
  top:2px;
  left:2px;
  width:6px;
  height:30px;
  border:1px solid rgb(202,202,202);
  background-color:rgb(255,255,255);
  border-radius: 3px;
}
这段代码是用来制作链条的效果,也是这个案例中最为关键,也是难度稍大一点的地方,灵活运用好“:before”和“:after”就可以轻意实现。到此这个效果就算是制作完成了。不知道你学会了?
如需转载,烦请注昨出处:http://www.w3cplus.com/demo/create-login-form-like-the-calendar.html


