藤藤每日一练——Metro UI For Block
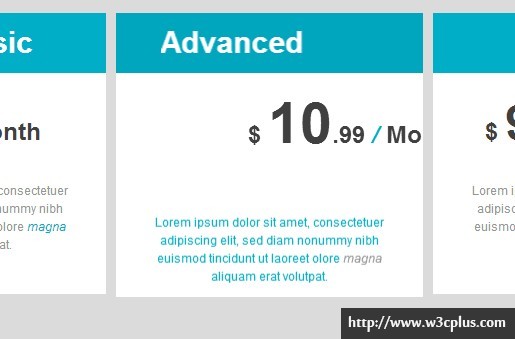
这个DEMO是一个区块的展示效果,在Web中经常可见,你也可以简单的理解成是一个三列展示区块,在这个DEMO中,整体风格是采用的Metro UI设计,但是我们在效果中添加了一些CSS3的动画效果,让整个DEMO看起来更大生动。
HTML CODE
这样的结构是常见的一种,在这个案例中采用的是列表结构,在每个区块中,我们有一个标题、有一个价格标签和简短的文字介绍:
<div class="item clearfix">
  <ul class="item-list">
    <li>
      <div class="item-1">
        <h2><span>BasicBasic</span></h2>
        <h3>$ <span>5</span>.99 <em>/</em> Month</h3>
        <p>Lorem ...</p>
      </div>
    </li>
    ...
  </ul>
</div>
CSS CODE
先进行布局样式的处理,此处采用的是float来让他们排列在一行:
body {
  background-color: #dbdbdb;
}
.demo {
  margin: 40px auto 0;
  width: 960px;
}
.item-list li {
  float: left;
  width: 33%;
  text-align: center;
  overflow: hidden;
}
/*使用CSS的属性选择器,选择了类名以“item”开头的Div元素*/
div[class^="item-"] {
  margin-left: 10px;
  background-color: #fff;
}
接下来对每个区块内部的元素进行美化效果:
.item-list h2 {
  color: #fff;
  font-size: 30px;
  line-height: 60px;
  background-color: #00aec7;
  transition: all 200ms linear;
}
.item-list h3 {
  font-size: 24px;
  line-height: 100px;
}
.item-list h3 span {
  font-size: 48px;
  transition: all 300ms linear;
}
.item-list em {
  color: #00aec7;
  transition: all 200ms linear;
}
.item-list p {
  color: #969696;
  padding: 0 20px 40px;
  transition: all 200ms linear;
}
.item-list div:hover h2 {
  background-color: #006675;
  transition: all 2s linear;
}
第二步中最关键的是使用了transition属性对每个元素做了一个动画过渡效果,你可以发现当页面加载的时候,会有一些动画效果。如果你没有接触过,transition属性的使用,可以狠狠的点击这里查看。
transition: all 200ms linear; /*我们案例中用了perfixfree.min.js,所以css3的属性只写了一个*/
接下来是最关键的一步了,在鼠标经过每个div区块时,里面的每个元素会有一个动画效果,实现在这三个动画效果,我们需要使用@keyframes来创建三个不动的动画:
/*元素从左向右移进*/
@keyframes moveF_Left {
  0% {
    transform: translateX(-100%);
  }
  100% {
    transform: translateX(0%);
  }
}
/*元素从右向左移进*/
@keyframes moveF_Right {
  0% {
    transform: translateX(100%);
  }
  100% {
    transform: translateX(0%);
  }
}
/*元素从下向上移进*/
@keyframes moveF_Bottom {
  0% {
    transform: translateY(100%);
  }
  100% {
    transform: translateY(0%);
  }
}
动画创建好了以后,需要事件触发其效果,在这里使用的是“:hover”来触发动画:
.item-list div:hover h2 span {
  display: inline-block;
  animation: moveF_Left 500ms ease;
}
.item-list div:hover h3 {
  animation: moveF_Right 500ms ease;
}
.item-list div:hover h3 span {
  font-size: 60px;
}
.item-list div:hover p {
  animation: moveF_Bottom 500ms ease;
  color: #00aec7;
}
.item-list div:hover p em {
  color: #969696;
}
通过使用animation属性调用了当初创建的动画。这样一来就完成了整个DEMO的效果,详细的CSS代码如下所示:
body {
  background-color: #dbdbdb;
}
.demo {
  margin: 40px auto 0;
  width: 960px;
}
.item-list li {
  float: left;
  width: 33%;
  text-align: center;
  overflow: hidden;
}
/*使用CSS的属性选择器,选择了类名以“item”开头的Div元素*/
div[class^="item-"] {
  margin-left: 10px;
  background-color: #fff;
}
.item-list h2 {
  color: #fff;
  font-size: 30px;
  line-height: 60px;
  background-color: #00aec7;
  transition: all 200ms linear;
}
.item-list h3 {
  font-size: 24px;
  line-height: 100px;
}
.item-list h3 span {
  font-size: 48px;
  transition: all 300ms linear;
}
.item-list em {
  color: #00aec7;
  transition: all 200ms linear;
}
.item-list p {
  color: #969696;
  padding: 0 20px 40px;
  transition: all 200ms linear;
}
.item-list div:hover h2 {
  background-color: #006675;
  transition: all 2s linear;
}
.item-list div:hover h2 span {
  display: inline-block;
  animation: moveF_Left 500ms ease;
}
.item-list div:hover h3 {
  animation: moveF_Right 500ms ease;
}
.item-list div:hover h3 span {
  font-size: 60px;
}
.item-list div:hover p {
  animation: moveF_Bottom 500ms ease;
  color: #00aec7;
}
.item-list div:hover p em {
  color: #969696;
}
/*元素从左向右移进*/
@keyframes moveF_Left {
  0% {
    transform: translateX(-100%);
  }
  100% {
    transform: translateX(0%);
  }
}
/*元素从右向左移进*/
@keyframes moveF_Right {
  0% {
    transform: translateX(100%);
  }
  100% {
    transform: translateX(0%);
  }
}
/*元素从下向上移进*/
@keyframes moveF_Bottom {
  0% {
    transform: translateY(100%);
  }
  100% {
    transform: translateY(0%);
  }
}
如需转载,烦请注明出处:http://www.w3cplus.com/demo/metro-ui-for-block.html


