使用Web Components API制作Favorite Star按钮
最近我们开始在Onsen UI上使用Web Components API。API为开发人员提供了创建新的或扩展HTML标签元素的能力。我们重新使用Web Components API写一些简单的Onsen UI组件,但我们不会停止脚步,我们会继续努力。我们的目标是使用Web Components API重写Onsen UI核心功能,并且我们也提供了Angular 1.x版本的支持。
我们这样做的原因是,不希望Onsen UI只能为AngularJS开发人员使用。我们希望不管你是Angular 1.x,React.js或jQuery开发者,都能使用Onsen UI。即将到来的Angular 2.x对Web Components标准更高度的支持,这让我们感到非常的兴奋。
在这篇教程中我们将看看如何使用Web Components API实现一个简单的组件。我们将要学习的Web组件称为"favorite button / favorite star"。
有关于这篇教程中的代码可以点击这里下载。
我们要做什么呢?
我们要实现一个名叫"favorite star / favorite button"的组件。你知道这样的组件在网上可以很好的找到,可以用来表示你喜欢的东西。
效果就如下所示:
Web Components API有两个最大的特点:简单和抽象。定制的元素是进行封装过的,所以开发人员使用定制后的标签并不需要去关心它是如何封装的。可以像过去使用HTML标签一样:
<favorite-star></favorite-star>
这样就可以得到一个很好的★,用户可以点击。如果希望★是金色的,我们可以这样做:
<favorite-star active></favorite-star>
我们开始做吧
首先,需要创建一个属于我们的标签。然后通过document.registerElement()函数注册一个新标签。并且将需要的标签名称当参数对象做为该函数的参数。参数可以包含一个原型对象,用来定义元素的行为。
window.FavoriteStarElement = document.registerElement('favorite-star', {
  prototype: proto
});
因为我们正在扩展HTML的词汇,所以我们有意义的在扩展HTMLElement对象的prototype:
var proto = Object.create(HTMLElement.prototype);
<template>标签
<template>标签是用来封装HTML,因此它可以任何你想使用的应用程序中多个地方重用。把样式和组件的内部元素HTML放在这里面。在这个示例中,内部的HTML仅仅是用<span>放了一个有用的utf-8的★编码(★)。
可以点击这里查看完整的样式,它定义了组件的颜色和一个bounce动画效果:
<template>
<style>
...
</style>
<span class="favorite-star-character">★</span>
</template>
Shadow DOM
Web Components规范中最令人感到困惑的一个部分是规范中的Shadow DOM。Shadow DOM是一个具有特殊属性的子树。它可以被视为一个DOM,而且和页面其他部分分开。Shadow DOM内定义的样式并不会影响页面其他部分。
这对于自定义元素是非常好的优势,因为我们可以定义类和风格,而不必担心会有副作用。常使用element.createShadowRoot()来创建一个新的Shadow DOM树。
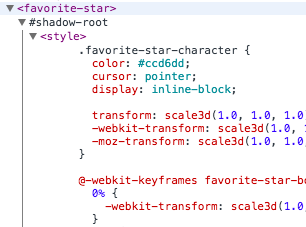
Chrome浏览器已经支持Shadow DOM,所以你可以使用开发者工具查看,比如像这样查看一个Shadow DOM树:

生命周期回调
Web Components在创建自定义元素时有四个生命周期可回调。在创建元素中最重要的是执行createdCallback。
还有两个回调函数attachedCallback和detachedCallback在元素中做添加或删除时可执行。这些都是有利于注册和破坏事件处理程序时,避免内容泄漏。
最后还有一个叫做attributeChangedCallback的回调函数。它将用来对HTML的属性值进行修改。言外之意,这将给我们更大的权利,可以在元素外操作元素内部HTML属性。比如,开发人员使用element.setAttribute()或element.removeAttribute()可以对元素内部的HTML设置和移除属性。
首先通过createdCallback来创建组件:
// Get the document element.
var currentScript = document._currentScript || document.currentScript,
  doc = currentScript.ownerDocument,

// Create the prototype.
var proto = Object.create(HTMLElement.prototype);

// Callback that's executed when the element is created.
proto.createdCallback = function() {
  // Fetch the <template> element and extract the content..
  var template = doc.querySelector('template'),
      clone = document.importNode(template.content, true);

  // Create a Shadow DOM root and append the template content.
  this.shadowRoot = this.createShadowRoot();
  this.shadowRoot.appendChild(clone);

  // Find the inner <span> element.
  this.element = this.shadowRoot.querySelector('.favorite-star-character');

  // Create event handlers.
  this.boundOnClick = this.onClick.bind(this);
  this.boundOnMouseover = this.onMouseover.bind(this);
  this.boundOnMouseout = this.onMouseout.bind(this);

  // Check if it's initialized as active.
  if (this.hasAttribute('active')) {
    this.element.setAttribute('active', '');
  }
};
接下来需要自定义一些行为,比如说用户鼠标悬停在五角星上以及用户点击五角星等。事件的处理可以使用attachedCallback注册和detachedCallback移除:
proto.attachedCallback = function() {
  var el = this.element;

  // Register event handlers.
  el.addEventListener('click', this.boundOnClick);
  el.addEventListener('mouseout', this.boundOnMouseout);
  el.addEventListener('mouseover', this.boundOnMouseover);
}

proto.detachedCallback = function() {
  var el = this.element;

  // Remove event handlers.
  el.removeEventListener('click', this.boundOnClick);
  el.removeEventListener('mouseout', this.boundOnMouseout);
  el.removeEventListener('mouseover', this.boundOnMouseover);
}

proto.toggle = function() {
  if (this.hasAttribute('active')) {
    this.removeAttribute('active');
  }
  else {
    this.setAttribute('active', '');
  }
}

proto.onClick = function() {
  this.toggle();
}

// We cannot use the :hover pseudoclass since it would have incorrect behavior
// when the user deactivates the star. Thus we add our own "hover" class.
proto.onMouseover = function() {
  var el = this.element;
  if (!el.hasAttribute('active')) {
    el.setAttribute('hover', '');
  }
}

proto.onMouseout = function() {
  var el = this.element;
  el.removeAttribute('hover');
}
最后通过attributeChangedCallback来添加我们需要的正确行为,对元素属性做改变:
proto.attributeChangedCallback = function(attr) {
  if (attr === 'active') {
    var el = this.element;
    if (this.hasAttribute('active')) {
      el.setAttribute('active', '');
    }
    else {
      el.removeAttribute('active');
      el.removeAttribute('hover');
    }
  }
}
总结
这些API到今天还没有得到普遍的支持。然而,我们可以使用polyfills给Web Components添加功能,使其能在生产环境中使用。
前面提到过了,但我认为是这工作,再提一提。现在的Onsen UI是使用Angular 1.x来定义元素。而Web Components API让我们有一个新的方式来定义自己定义的元素,所以我们决定使用。当然,我们依然爱AngularJs 1.x,我们也会继续在Onsen UI中使用。
通过Web Components API重写组件,将会更有利的扩展和支持其他的框架。请继续支持Onsen UI。如果你有任何关于这篇文章的问题,欢迎在评论中一起讨论。
本文根据@ANDREAS ARGELIUS的《Tutorial: Let's make a "Favorite Star Button" in JavaScript using the Web Components API!》所译,整个译文带有我们自己的理解与思想,如果译得不好或有不对之处还请同行朋友指点。如需转载此译文,需注明英文出处:http://onsen.io/blog/tutorial-favorite-star-button-javascript-web-components-api/。
如需转载,烦请注明出处:http://www.w3cplus.com/web-components/tutorial-favorite-star-button-javascript-web-components-api.html


