CSS3制作 Progress Bars
作者:大漠 日期:2011-12-08 点击:2931

Progress Bar直译过来就是“进度条”,也就是说今天要和大家一起探讨进度条的作方法。我想进度条大家都有看到过,而且还随处可见,他们表示的是某个过程,显示目前完成状态。最常见的是文件的上传和下载,有一个动态的进度条,通过这个进度可的动态变化告诉我们文件上传或下载的完成程度。换而言之,无论在某一个点或一个桌面程序,或者说我们的Web应用程序或,我们都需要使用到进度条的UI制作。那么在这篇文章中,我和大家一起来学习如何使用CSS3的相关属性来创建一个时尚的、动态的进度条,而且还将扩展一部分jQuery代码,让其从0至100%动态完成。
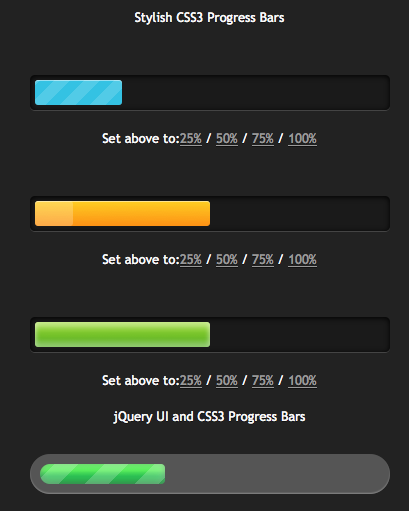
我们首先来看一看下面的DEMO效果:
下面我们针对上面的DEMO来说说其制作过程。
HTML MarKup
      <div class="progress-bar blue stripes">
          <span style="width:25%;"></span>
      </div>
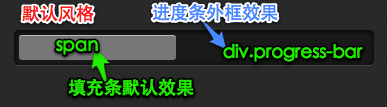
上面的结构就是我们用来制作Progress Bar的HTML结构,是不是很简单的呀,不过我还是做一下简单的说明:
- div.progress-bar:这个div用来定义Progress Bar的外框风格;
- div.blue:这个是我们在“div.progress-bar”中增加一个类名,用来控制其另外的样式风格,这里的话,我们是使用这个类将“Progress Bar”样式定制为兰色风格;
- div.stripes:这个类名和上面的“blue”是一样的意思,只不过所起的作用不同,在这个实例子,在这个类上使用animation给“Progress Bar”制作动画效果;
- span:这个span是用来控制“Progress Bar”的填充程序,在此例中,一开始给了其一个值,用来指定他的进度位置,建议使用百分比来控制其宽度,达到填充效果。
CSS Code
写好的结构后,我们就一起来学习样式的制作,这里分几个步骤来完成样式的制作:
1、进度条的默认风格:
     /*=====进度条外框样式======*/
     .progress-bar {
       background-color: #1a1a1a;
       height: 25px;
       padding: 5px;
       width: 350px;
       margin: 50px 0 20px 0;
       -moz-border-radius: 5px;
       -webkit-border-radius: 5px;
       border-radius: 5px;
       -moz-box-shadow: 0 1px 5px #000 inset,0 1px 0 #444;
       -webkit-box-shadow: 0 1px 5px #000 inset,0 1px 0 #444;
       box-shadow: 0 1px 5px #000 inset,0 1px 0 #444;
     }
     /*=====填充条的默认风格=====*/
     .progress-bar span {
       display: inline-block;
       height: 100%;
       background-color: #777;
       -moz-border-radius: 3px;
       -webkit-border-radius: 3px;
       border-radius: 3px;
       -moz-box-shadow: 0 1px 0 rgba(255,255,255,.5) inset;
       -webkit-box-shadow: 0 1px 0 rgba(255,255,255,.5) inset;
       box-shadow: 0 1px 0 rgba(255,255,255,.5) inset;
       -moz-transition: width 0.4s ease-in-out;
       -webkit-transition: width 0.4s ease-in-out;
       -ms-transition: width 0.4s ease-in-out;
       -o-transition: width 0.4s ease-in-out;
       transition: width 0.4s ease-in-out;
     }
上面的代码让我们完成了“Progress Bar”的默认风格:
2、描色效果
我想上面的效果并不是大家所需要的,那么接下主要使用CSS3中的Gradient属性,给给“Progress Bar”的填充条换色:
     /*=======blue bar=======*/
     .blue span {
       background-color: #34c2e3;
     }
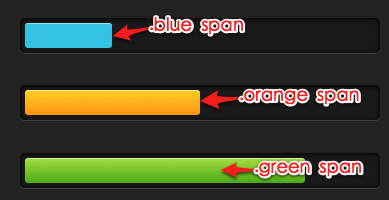
看看被换了色的填充条效果:

为了做出和DEMO一样的效果,我们在前面的HTML基础上加上另外两个“Progress Bar”的结构:
     <!-- 兰色 -->
      <div class="progress-bar blue stripes">
           <span style="width:25%;"></span>
       </div>


      <!-- 桔色 -->
       <div class="progress-bar orange shine">
           <span style="width:50%"></span>
       </div>

       <!-- 绿色 -->
       <div class="progress-bar green glow" id="glow-progress-bar">
           <span style="width:80%;"></span>
       </div>
下面给桔色和绿色的填充条加色:
      /*==========orange bar============*/
       .orange span {
         background-color: #fecf23;
         background-image: -webkit-gradient(linear, left top, left bottom, from(#fecf23), to(#fd9215));
         background-image: -webkit-linear-gradient(top, #fecf23, #fd9215);
         background-image: -moz-linear-gradient(top, #fecf23, #fd9215);
         background-image: -o-linear-gradient(top, #fecf23, #fd9215);
         background-image: linear-gradient(top, #fecf23, #fd9215);
       }

       /*================green bar==============*/
       .green span {
         background-color: #a5df41;
         background-image: -webkit-gradient(linear, left top, left bottom, from(#a5df41), to(#4ca916));
         background-image: -webkit-linear-gradient(top, #a5df41, #4ca916);
         background-image: -moz-linear-gradient(top, #a5df41, #4ca916);
         background-image: -o-linear-gradient(top, #a5df41, #4ca916);
         background-image: linear-gradient(top, #a5df41, #4ca916);
       }
效果如下所示:
这样下来,“Progress Bar”比默认效果是好看了不少,但还是不太理想,下面在此基础上,在给他们加点料。
3、填充条的动画效果
这里所说的填充条的动画效果,并不是说使用jQuery或者javascript制作的效果,而是使用纯CSS3的相关属性制作的效果,具体的看代码吧:
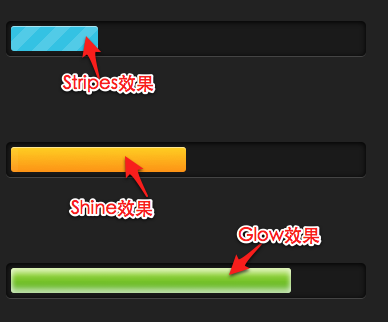
Stripes效果
这种效果,早前Red-team在Cool notification messages with CSS3 & jQuery一文中就有详细的介绍,感兴趣的就进去看看吧,这里就不多说了。关键一点是:background-size和gradient的配合,制作背景图片效果,再使用animation加上一定的动效果。具体大家看代码体会吧。
     /*==============stripes bar=============*/
     .stripes span {
       -webkit-background-size: 30px 30px;
       -moz-background-size: 30px 30px;
       -ms-background-size: 30px 30px;
       -o-background-size: 30px 30px;
       background-size: 30px 30px;
       background-image: -webkit-gradient(linear, left top, right bottom,color-stop(.25, rgba(255, 255, 255, .15)), color-stop(.25, transparent),color-stop(.5, transparent), color-stop(.5, rgba(255, 255, 255, .15)),color-stop(.75, rgba(255, 255, 255, .15)), color-stop(.75, transparent),to(transparent));
       background-image: -webkit-linear-gradient(135deg, rgba(255, 255, 255, .15) 25%, transparent 25%,transparent 50%, rgba(255, 255, 255, .15) 50%, rgba(255, 255, 255, .15) 75%,transparent 75%, transparent);
       background-image: -moz-linear-gradient(135deg, rgba(255, 255, 255, .15) 25%, transparent 25%,  transparent 50%, rgba(255, 255, 255, .15) 50%, rgba(255, 255, 255, .15) 75%, transparent 75%, transparent);
       background-image: -ms-linear-gradient(135deg, rgba(255, 255, 255, .15) 25%, transparent 25%,transparent 50%, rgba(255, 255, 255, .15) 50%, rgba(255, 255, 255, .15) 75%,transparent 75%, transparent);
       background-image: -o-linear-gradient(135deg, rgba(255, 255, 255, .15) 25%, transparent 25%,transparent 50%, rgba(255, 255, 255, .15) 50%, rgba(255, 255, 255, .15) 75%,transparent 75%, transparent);
       background-image: linear-gradient(135deg, rgba(255, 255, 255, .15) 25%, transparent 25%,transparent 50%, rgba(255, 255, 255, .15) 50%, rgba(255, 255, 255, .15) 75%,transparent 75%, transparent);
       -moz-animation: animate-stripes 3s linear infinite;
       -webkit-animation: animate-stripes 3s linear infinite;
     }

     @-moz-keyframes animate-stripes {
       0% {
         background-position: 0 0;
       }
       100% {
         background-position: 60px 0;
       }
     }

     @-webkit-keyframes animate-stripes {
        0% {
           background-position: 0 0;
         }
         100% {
           background-position: 60px 0;
         }
     }
Shine效果
这个效果比较简单,在填充条上使用了一个“:after”,并在其上面使用animation制作了一个动态变色效果:
     /*========shine bar=======*/
      .shine span {
        position: relative;
      }
      .shine span:after {
        content: "";
        opacity: 0;
        position: absolute;
        top: 0;
        right: 0;
        bottom: 0;
        left: 0;
        background: #fff;
        -moz-border-radius: 3px;
        -webkit-border-radius: 3px;
        border-radius: 3px;
        -moz-animation: animate-shine 2s ease-out infinite;
        -webkit-animation: animate-shine 2s ease-out infinite;
      }

      @-moz-keyframes animate-shine {
        0% {
          opacity: 0;
          width: 0;
        }
        50% {
          opacity: 0.5;
        }
        100%{
          opacity: 0;
          width: 95%;
        }
      }
      @-webkit-keyframes animate-shine {
        0% {
          opacity: 0;
          width: 0;
        }
        50% {
          opacity: 0.5;
        }
        100%{
          opacity: 0;
          width: 95%;
        }
      }
Glow效果
这个发光效果也相对来说是比较简单的,只是利用box-shadow和animation制作的一个简单的发光效果:
      /*==========glow bar==========*/
       .glow span {
         -moz-box-shadow: 0 5px 5px rgba(255, 255, 255, .7) inset, 0 -5px 5px rgba(255, 255, 255, .7) inset;
         -webkit-box-shadow: 0 5px 5px rgba(255, 255, 255, .7) inset, 0 -5px 5px rgba(255, 255, 255, .7) inset;
         box-shadow: 0 5px 5px rgba(255, 255, 255, .7) inset, 0 -5px 5px rgba(255, 255, 255, .7) inset;
         -webkit-animation: animate-glow 1s ease-out infinite;
         -moz-animation: animate-glow 1s ease-out infinite;
       }
       @-moz-keyframes animate-glow {
         0% {
           -moz-box-shadow: 0 5px 5px rgba(255, 255, 255, .7) inset, 0 -5px 5px rgba(255, 255, 255, .7) inset;
         }
         50% {
           -moz-box-shadow: 0 5px 5px rgba(255, 255, 255, .3) inset, 0 -5px 5px rgba(255, 255, 255, .3) inset;
         }
         100% {
           -moz-box-shadow: 0 5px 5px rgba(255, 255, 255, .7) inset, 0 -5px 5px rgba(255, 255, 255, .7) inset;
         }
       }
        @-webkit-keyframes animate-glow {
           0% {
             -webkit-box-shadow: 0 5px 5px rgba(255, 255, 255, .7) inset, 0 -5px 5px rgba(255, 255, 255, .7) inset;
           }
           50% {
             -webkit-box-shadow: 0 5px 5px rgba(255, 255, 255, .3) inset, 0 -5px 5px rgba(255, 255, 255, .3) inset;
           }
           100% {
             -webkit-box-shadow: 0 5px 5px rgba(255, 255, 255, .7) inset, 0 -5px 5px rgba(255, 255, 255, .7) inset;
           }
         }
下面我们一起来看看这三个动画效果:
最后的样式代码:
     /*============Start Progress Bar============*/
     .progress-bar {
       background-color: #1a1a1a;
       height: 25px;
       padding: 5px;
       width: 350px;
       margin: 50px 0 20px 0;
       -moz-border-radius: 5px;
       -webkit-border-radius: 5px;
       border-radius: 5px;
       -moz-box-shadow: 0 1px 5px #000 inset,0 1px 0 #444;
       -webkit-box-shadow: 0 1px 5px #000 inset,0 1px 0 #444;
       box-shadow: 0 1px 5px #000 inset,0 1px 0 #444;
     }

     .progress-bar span {
       display: inline-block;
       height: 100%;
       background-color: #777;
       -moz-border-radius: 3px;
       -webkit-border-radius: 3px;
       border-radius: 3px;
       -moz-box-shadow: 0 1px 0 rgba(255,255,255,.5) inset;
       -webkit-box-shadow: 0 1px 0 rgba(255,255,255,.5) inset;
       box-shadow: 0 1px 0 rgba(255,255,255,.5) inset;
       -moz-transition: width 0.4s ease-in-out;
       -webkit-transition: width 0.4s ease-in-out;
       -ms-transition: width 0.4s ease-in-out;
       -o-transition: width 0.4s ease-in-out;
       transition: width 0.4s ease-in-out;
     }

     /*=======blue bar=======*/
     .blue span {
       background-color: #34c2e3;
     }

     /*==========orange bar============*/
     .orange span {
       background-color: #fecf23;
       background-image: -webkit-gradient(linear, left top, left bottom, from(#fecf23), to(#fd9215));
       background-image: -webkit-linear-gradient(top, #fecf23, #fd9215);
       background-image: -moz-linear-gradient(top, #fecf23, #fd9215);
       background-image: -o-linear-gradient(top, #fecf23, #fd9215);
       background-image: linear-gradient(top, #fecf23, #fd9215);
     }

     /*================green bar==============*/
     .green span {
       background-color: #a5df41;
       background-image: -webkit-gradient(linear, left top, left bottom, from(#a5df41), to(#4ca916));
       background-image: -webkit-linear-gradient(top, #a5df41, #4ca916);
       background-image: -moz-linear-gradient(top, #a5df41, #4ca916);
       background-image: -o-linear-gradient(top, #a5df41, #4ca916);
       background-image: linear-gradient(top, #a5df41, #4ca916);
     }

     /*==============stripes bar=============*/
     .stripes span {
       -webkit-background-size: 30px 30px;
       -moz-background-size: 30px 30px;
       -ms-background-size: 30px 30px;
       -o-background-size: 30px 30px;
       background-size: 30px 30px;
       background-image: -webkit-gradient(linear, left top, right bottom,color-stop(.25, rgba(255, 255, 255, .15)), color-stop(.25, transparent),color-stop(.5, transparent), color-stop(.5, rgba(255, 255, 255, .15)),color-stop(.75, rgba(255, 255, 255, .15)), color-stop(.75, transparent),to(transparent));
       background-image: -webkit-linear-gradient(135deg, rgba(255, 255, 255, .15) 25%, transparent 25%,transparent 50%, rgba(255, 255, 255, .15) 50%, rgba(255, 255, 255, .15) 75%,transparent 75%, transparent);
       background-image: -moz-linear-gradient(135deg, rgba(255, 255, 255, .15) 25%, transparent 25%,  transparent 50%, rgba(255, 255, 255, .15) 50%, rgba(255, 255, 255, .15) 75%, transparent 75%, transparent);
       background-image: -ms-linear-gradient(135deg, rgba(255, 255, 255, .15) 25%, transparent 25%,transparent 50%, rgba(255, 255, 255, .15) 50%, rgba(255, 255, 255, .15) 75%,transparent 75%, transparent);
       background-image: -o-linear-gradient(135deg, rgba(255, 255, 255, .15) 25%, transparent 25%,transparent 50%, rgba(255, 255, 255, .15) 50%, rgba(255, 255, 255, .15) 75%,transparent 75%, transparent);
       background-image: linear-gradient(135deg, rgba(255, 255, 255, .15) 25%, transparent 25%,transparent 50%, rgba(255, 255, 255, .15) 50%, rgba(255, 255, 255, .15) 75%,transparent 75%, transparent);
       -moz-animation: animate-stripes 3s linear infinite;
       -webkit-animation: animate-stripes 3s linear infinite;
     }

     @-moz-keyframes animate-stripes {
       0% {
         background-position: 0 0;
       }
       100% {
         background-position: 60px 0;
       }
     }

     @-webkit-keyframes animate-stripes {
        0% {
           background-position: 0 0;
         }
         100% {
           background-position: 60px 0;
         }
     }
     /*========shine bar=======*/
     .shine span {
       position: relative;
     }
     .shine span:after {
       content: "";
       opacity: 0;
       position: absolute;
       top: 0;
       right: 0;
       bottom: 0;
       left: 0;
       background: #fff;
       -moz-border-radius: 3px;
       -webkit-border-radius: 3px;
       border-radius: 3px;
       -moz-animation: animate-shine 2s ease-out infinite;
       -webkit-animation: animate-shine 2s ease-out infinite;
     }

     @-moz-keyframes animate-shine {
       0% {
         opacity: 0;
         width: 0;
       }
       50% {
         opacity: 0.5;
       }
       100%{
         opacity: 0;
         width: 95%;
       }
     }
     @-webkit-keyframes animate-shine {
       0% {
         opacity: 0;
         width: 0;
       }
       50% {
         opacity: 0.5;
       }
       100%{
         opacity: 0;
         width: 95%;
       }
     }
     /*==========glow bar==========*/
     .glow span {
       -moz-box-shadow: 0 5px 5px rgba(255, 255, 255, .7) inset, 0 -5px 5px rgba(255, 255, 255, .7) inset;
       -webkit-box-shadow: 0 5px 5px rgba(255, 255, 255, .7) inset, 0 -5px 5px rgba(255, 255, 255, .7) inset;
       box-shadow: 0 5px 5px rgba(255, 255, 255, .7) inset, 0 -5px 5px rgba(255, 255, 255, .7) inset;
       -webkit-animation: animate-glow 1s ease-out infinite;
       -moz-animation: animate-glow 1s ease-out infinite;
     }
     @-moz-keyframes animate-glow {
       0% {
         -moz-box-shadow: 0 5px 5px rgba(255, 255, 255, .7) inset, 0 -5px 5px rgba(255, 255, 255, .7) inset;
       }
       50% {
         -moz-box-shadow: 0 5px 5px rgba(255, 255, 255, .3) inset, 0 -5px 5px rgba(255, 255, 255, .3) inset;
       }
       100% {
         -moz-box-shadow: 0 5px 5px rgba(255, 255, 255, .7) inset, 0 -5px 5px rgba(255, 255, 255, .7) inset;
       }
     }
      @-webkit-keyframes animate-glow {
         0% {
           -webkit-box-shadow: 0 5px 5px rgba(255, 255, 255, .7) inset, 0 -5px 5px rgba(255, 255, 255, .7) inset;
         }
         50% {
           -webkit-box-shadow: 0 5px 5px rgba(255, 255, 255, .3) inset, 0 -5px 5px rgba(255, 255, 255, .3) inset;
         }
         100% {
           -webkit-box-shadow: 0 5px 5px rgba(255, 255, 255, .7) inset, 0 -5px 5px rgba(255, 255, 255, .7) inset;
         }
       }
注:上面的样式代码来自于:Stylish CSS3 progress bars
上面的制作,我们一起学习了纯CSS3制作“Progress Bar”的方法,为了让效果看起来更好些,我加进了一点jQuery代码:
HTML Markup
     <div class="progress-bar blue stripes">
         <span style="width:25%;"></span>
     </div>
     <p>Set above to:<a class="quarter" href="#">25%</a> /	<a class="half" href="#">50%</a> / <a class="three-quarters" href="#">75%</a> /	<a class="full" href="#">100%</a></p>
jQuery Code
     <script type="text/javascript" src="http://code.jquery.com/jquery-latest.min.js"></script>
     <script type="text/javascript">
       $(function(){
         $(".quarter").click(function(){
           $(this).parent().prev().children("span").css("width","25%");
         });

         $(".half").click(function(){
           $(this).parent().prev().children("span").css("width","50%");
         });

         $(".three-quarters").click(function(){
           $(this).parent().prev().children("span").css("width","75%");
         });

         $(".full").click(function(){
           $(this).parent().prev().children("span").css("width","100%");
         });
       });
     </script>
这样我们就制作出前面DEMO展示的前一部分效果。
CSS3制作Progress bar的扩展阅读:
- Stylish CSS3 progress bars
- CSS3 Progress Bars
- CSS3 Progress Bars
- How to Create Progress Bar with CSS3
- create progress bar with css3
- Pure CSS Animated Progress Bar
- Pure CSS Progress Bar
- Yet another pure CSS progress bar
- Pure CSS Animated Progress Bar
- 30 CSS3 Progress Bars 100% Free for Download
前面DEMO还展示了一个jQuery Progress Bar的效果,下面我简单的贴上制作的代码:
HTML Markup
<div id="progressbar"></div>
和前面的对比,这个使用jQuery UI制作Progress bar结构更为简单,下面我先把这个插件加上:
jQuery Code
     <script type="text/javascript" src="http://code.jquery.com/jquery-latest.min.js"></script>
     <script src="http://ajax.googleapis.com/ajax/libs/jqueryui/1.8/jquery-ui.min.js"></script>
     <script type="text/javascript">
       $(function(){
           $("#progressbar").progressbar({ value: 37 });
        });
     </script>
运行上面的jQuery代码后,我们当实加进来的HTML就会有变化了:
    <div id="progressbar" class="ui-progressbar ui-widget ui-widget-content ui-corner-all" role="progressbar" aria-valuemin="0" aria-valuemax="100" aria-valuenow="37" >
      <div class="ui-progressbar-value ui-widget-header ui-corner-left" style="width: 37%;"></div>
    </div>
接下来,我们只要使用前面的CSS3方法给他加上样式就OK了:
      .ui-progressbar {
         height: 20px;  /* Can be anything */
         position: relative;
         background: #555;
         -moz-border-radius: 25px;
         -webkit-border-radius: 25px;
         border-radius: 25px;
         padding: 10px;
         -webkit-box-shadow: inset 0 -1px 1px rgba(255,255,255,0.3);
         -moz-box-shadow   : inset 0 -1px 1px rgba(255,255,255,0.3);
         box-shadow        : inset 0 -1px 1px rgba(255,255,255,0.3);
       }

       .ui-progressbar-value {
         display: block;
         height: 100%;
         -webkit-border-radius: 20px 8px 8px 20px;
         -moz-border-radius: 20px 8px 8px 20px;
         border-radius: 20px 8px 8px 20px;
         background-color: rgb(43,194,83);
         background-image: -webkit-gradient(linear,left bottom,left top,color-stop(0, rgb(43,194,83)),color-stop(1, rgb(84,240,84)));
         background-image: -webkit-linear-gradient(center bottom,rgb(43,194,83) 37%,rgb(84,240,84) 69%);
         background-image: -moz-linear-gradient(center bottom,rgb(43,194,83) 37%,rgb(84,240,84) 69%);
         background-image: -ms-linear-gradient( center bottom, rgb(43,194,83) 37%, rgb(84,240,84) 69%);
         background-image: -o-linear-gradient(center bottom,rgb(43,194,83) 37%, rgb(84,240,84) 69%);
         -webkit-box-shadow:inset 0 2px 9px  rgba(255,255,255,0.3),inset 0 -2px 6px rgba(0,0,0,0.4);
         -moz-box-shadow:inset 0 2px 9px  rgba(255,255,255,0.3), inset 0 -2px 6px rgba(0,0,0,0.4);
         box-shadow:inset 0 2px 9px  rgba(255,255,255,0.3), inset 0 -2px 6px rgba(0,0,0,0.4);
         position: relative;
         overflow: hidden;
       }

       .ui-progressbar-value:after{
         	content: "";
     			position: absolute;
     			top: 0;
     			left: 0;
     			bottom: 0;
     			right: 0;
     			background-image: -webkit-gradient(linear, 0 0, 100% 100%,  color-stop(.25, rgba(255, 255, 255, .2)), color-stop(.25, transparent), color-stop(.5, transparent),  color-stop(.5, rgba(255, 255, 255, .2)), color-stop(.75, rgba(255, 255, 255, .2)), color-stop(.75, transparent), to(transparent));
     			background-image: -moz-linear-gradient(-45deg, rgba(255, 255, 255, .2) 25%, transparent 25%,  transparent 50%,  rgba(255, 255, 255, .2) 50%,rgba(255, 255, 255, .2) 75%, transparent 75%,  transparent);
     			z-index: 1;
     			-webkit-background-size: 50px 50px;
     			-moz-background-size: 50px 50px;
     			-o-background-size: 50px 50px;
     			-ms-background-size: 50px 50px;
     			background-size: 50px 50px;
     			-webkit-animation: move 2s linear infinite;
     			-moz-animation: move 2s linear infinite;
     			-moz-border-radius: 20px 8px 8px 20px;
     			-webkit-border-radius: 20px 8px 8px 20px;
     			border-radius: 20px 8px 8px 20px;
     			overflow: hidden;
       }
       @-webkit-keyframes move {
   		    0% {
   		       background-position: 0 0;
   		    }
   		    100% {
   		       background-position: 50px 50px;
   		    }
   		}
   		@-moz-keyframes move {
   		    0% {
   		       background-position: 0 0;
   		    }
   		    100% {
   		       background-position: 50px 50px;
   		    }
   		}
最后我们一起来看看jQuery UI和CSS3一起制作的“Progress Bar”效果:

有关于jQuery UI Progressbar使用,大家要是感兴趣的可以到官网查阅。当然大家要是javascript或者jQuery厉害的话,还可以自己制作出一些更炫的效果。如果你要是和我一样不太懂这方面的,那么你可以参阅下面的扩展阅读。
jQuery制作Progress bar的扩展阅读:
- jQuery UI Progressbar
- How to create a kick-ass CSS3 progress bar
- Build a Customized Progress Bar Using CSS and JQuery
- Create Web 2.0 Progress Bars
- A JQuery Progress Bar Plugin
- jsProgressBarHandler
- Build a simple animated progress bar with tooltip
- Progress Bar Plugin
- 12 jQuery Loader, Progress Bar and Content Animations
- Very Beautiful CSS3 And JQuery progress bar
这样一个超炫的Progress Bar总算是完成了,希望大家喜欢这篇文章,如果你对些有更好的建议,欢迎在评论中留言。我们可以相互学习,相互讨论。谢谢你花时阅读此文。
如需转载烦请注明出处:W3CPLUS