OOCSS——核心篇
上一节在《OOCSS——概念篇》中主要介绍了一些有关于OOCSS的概念性的东西,并以博客的“meta data”为例介绍了如何创建一个基础对象。赞同和反对使用OOCSS的声音都有,对这个感兴趣的朋友可以不用理会这些反对的声音,因为那些声音是无法阻挡我们对新知识的渴望。今天主要想借助OOCSS官网提供的相关资料,一起来学习Nicole Sullivan写的OOCSS核心东西。
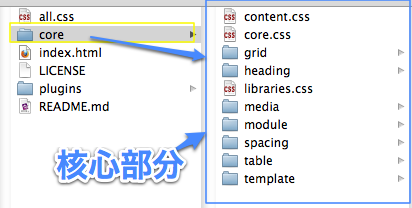
在介绍OOCSS核心之前,大家可以到下面这两个地址下载相关代码下来(官网上有一个地址是错误的): oocss(git hub),如果使用git 的朋友可以直接从这个地址git下来:https://github.com/stubbornella/oocss.git(或者:git://github.com/stubbornella/oocss.git)另外一个下载地址是:Alternate download。然后把压缩包解压缩出来,其结构如下所示:

模板(Template)
如果大家下载了OOCSS,那么你就能在上图的位置找到这个Template文件目录,在这里我要说的就是其中的 themplate.css和template.html两个文件,因为其中一个是HTML结构,另一个是样式规则,他们的结合组成了我们前面所说的一个基础对象,在这里我把他叫作——布局对像。作为一个前端人员,页面的布局是每一个项目都需要去做,而且是不断的重复去做。这样一来大家为何不把这一块提出来,然后专门为此写一个布局对像呢?下在我们先来看看Nicole Sullivan是如何写的布局。
HTML Markup
				<div class="page">
					<div class="head">Header section</div>
					<div class="body">
						<div class="leftCol">Left column</div>
						<div class="rightCol">Right column</div>
						<div class="main">Main section</div>
					</div>
					<div class="foot">Footer section</div>
				</div>
CSS规则
				body{_text-align:center;}/* IE5.5 */
				.main{display:table-cell;*display:block;width:auto;}
				.body,.main{*zoom:1;}
				.body:after,.main:after{clear:both;display:block;visibility:hidden;overflow:hidden;height:0 !important;line-height:0;font-size:xx-large;content:".";}
				.page{margin:0 auto;width:950px;_text-align:left;} /* wraps other template elems to set width */ /* text-align IE5.5 */
				/* "old school" and "liquid" extend page to allow for different page widths */
				.oldSchool{width:750px;}
				.gs960{width:960px;}
				.liquid{width:auto;margin:0;}
				/* ====== Columns ====== */
				.leftCol{float:left;width:250px;_margin-right:-3px;}
				.rightCol{float:right;width:300px;_margin-left:-3px;}
				/* extend columns to allow for common column widths */
				.gMail{width:160px;}
				.gCal{width:180px;}
				.yahoo{width:240px;}
				.myYahoo{width:300px;}
上面的代码主要是用来实现布局的效果,大家可以点击这里查看效果。上面的样式代码个人觉得有几个地方改进一下更好一些:
1、没有必要在body中设置text-align: center。因为这个主要是针对IE的怪异模式下让内容水平居中,就算是需要加也没有必要使用hack来解决,你可以这样来写
				body {text-align: center;}
				.page {text-align: left;}
2、清除浮动。至于清除浮动,我们只需要在需要清除浮动的地方增加一个clearfix类名(更详细的清除浮动可以点这里),并在这个类名上写相应的样式就OK了,换句话说创建一个清除浮动的对象,并可以重复使用,
				.body,.main{*zoom:1;}
				.body:after,.main:after{clear:both;display:block;visibility:hidden;overflow:hidden;height:0 !important;line-height:0;font-size:xx-large;content:".";}
				/*可以换成*/
				.clearfix:before,
				   .clearfix:after {
				      content:"";
				      display:table;
				   }
				   .clearfix:after {
				     clear:both;
				   }
				  .clearfix {
				     zoom:1; /* IE < 8 */
				  }
当然在html上也需要做相应的调整。
				<div class="page">
					<div class="head">Header section</div>
					<div class="body clearfix">
						<div class="leftCol">Left column</div>
						<div class="rightCol">Right column</div>
						<div class="main clearfix">Main section</div>
					</div>
					<div class="foot">Footer section</div>
				</div>
但此处展示了一种很好的三列布局的代码:
				.page{margin:0 auto;width:950px;_text-align:left;}
				.main{display:table-cell;*display:block;width:auto;}
				/* ====== Columns ====== */
				.leftCol{float:left;width:250px;_margin-right:-3px;}
				.rightCol{float:right;width:300px;_margin-left:-3px;}
这里我需要提出的一点是main的样式:.main{display:table-cell;*display:block;width:auto;}.
这里作者只是展示了一种她自己定义的布局模式,当然大家肯定也有一些自己独特的见解,我个人更趋向于grids布局,如:960s、YUI Grids、Blueprint CSS、YAML、1140Grids、Columnal。感兴趣的朋友可以了解一下这方在的知识。
媒体对象(Media Objects)
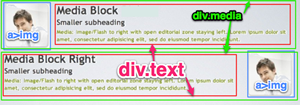
媒体对象常见的就是“左边是图像,右边是描述性的内容排列;或者左边是描述性内容排列,右边是图片”,如下图所示:

oocss用在媒体对象上,意味着图像可以是任意大小,并且描述性文本内容不会围绕着图片周围,只是保持在一条直线上左对齐,如上图那样的效果,很多网站都应用过,我们可以通过对像的使用css和html,我们不必要设置每列的宽度值,而且还可以使用任意大小的图像。像这种媒体对象,我们常使用,我们只需要为这样的效果创建一个对象,这样我们就可以在不同的项目中重复使用。首先创建html
				<div class="media clearfix">
				  <a href="aboutme.html" class="fixedMedia icon">
				     <img src="myimage.png" alt="img" />
				  </a>
				  <div class="mediaDes clearfix">
				     Something about me
				  </div>
				 </div>
给他写上样式
				.media {margin: 10px;}
				.mediaDes {display: table-cell;zoom:1;}
				.mediaDes > :first-child{margin-top:0;}/*你也可以在这个标签中加上一个类名.nmT {margin-top:0;}*/
				.mediaDes > :last-child{margin-bottom:0;}/*在这个标签上加上一个类名.nmB {margin-bottom:0}*/
				.fixedMedia {float:left;margin-right:10px;}/*这两个属性完全可以用类名来代替:.fl{float:left} .mrm {margin-right: 10px}*/
				.fixedMedia img {display: block;}
				.fixedMediaR {float:right;margin-left: 10px;}/*这两个属性完全可以用类名来代替:.fr{float:right} .mlm {margin-left: 10px}*/
上面是图像在左边,描述生内容在右边,如果你想图像在右边,描述性内容在左边。其实只要把fixedMedia换成fixedMdiaR就实能实现了。
网格系统(Grid System)
网格系统对于大家最熟悉应该是960s吧以及后面的1140s,那么今天这个oocss网格系统也是一样的原理,oocss网格系统使用基于宽度的百分比来设定的,其类名相当的好记,就是其宽度所占宽度的几分之几,如:
				.size1of1{float:none;}/*100%宽度*/
				.size1of2{width:50%;}/*占总宽度的一半:1/2*/
				.size1of3{width:33.33333%;}/*占总宽度的三分之一:1/3*/
				.size2of3{width:66.66666%;}/*占总宽度的三分之二:2/3*/
				.size1of4{width:25%;}/*占总宽度的四分之一:1/4*/
				.size3of4{width:75%;}/*占总宽度的四分之 三:3/4*/
				.size1of5{width:20%;}/*占总宽度的五分之一:1/5*/
				.size2of5{width:40%;}/*占总宽度的五分之二:2/5*/
				.size3of5{width:60%;}/*占总宽度的五分之三:3/5*/
				.size4of5{width:80%;}/*占总宽度的五分之四:4/5*/
这些单元格可以相互嵌套,并保持良好的比例,这些单元格不仅可以应用在页面的栏目上,而且还可以利用他创建出漂亮的布局。类似下在的结构:
				<div class="unit size1of2">
				  <div class="unit size1of3">
				     <p>Lorem</p>
				  </div>
				  <div class="unit size1of3">
				     <p>Ipsum</p>
				  </div>
				</div>
				<div class="unit size1of2">
				  <div class="unit size1of4">
				     <p>Lorem</p>
				   </div>
				   <div class="unit size3of4">
				      <p>Ipsum</p>
				    </div>
				</div>
为了让网格趋运行更稳定,可以用一个line的div一包装每组单元格,如下所示:
				<div class="line">
					<div class="unit size3of5"></div>
					<div class="unit size1of5"></div>
					<div class="unit size1of5 lastUnit"></div>
				</div>
我们可以给这种结构写上一个统一的样式:
				.line:before,.line:after{content:"";display:table;}
				.line:after{clear:both;}
				.line{*zoom:1;}
				.unit{float:left;}
				.unitRight{float:right;}
				.size1of1{float:none;}
				.size1of2{width:50%;}
				.size1of3{width:33.33333%;}
				.size2of3{width:66.66666%;}
				.size1of4{width:25%;}
				.size3of4{width:75%;}
				.size1of5{width:20%;}
				.size2of5{width:40%;}
				.size3of5{width:60%;}
				.size4of5{width:80%;}
				.lastUnit{float:none;display:block;display:table-cell;width:9999em;*width:auto;*zoom:1;_position:relative;_left:-3px;_margin-right:-3px;}
大家可以点击下在这个DEMO。这里只是介绍的一种思路,大家也还可以根据自己的需要,增加1/6,1/7等等。
模块(Module)
模块这一块,个人觉得很多地方需要根据自己的项目需求来制作,大家要是感兴趣可以去下载Nicole Sullivan写的那个Module,或者点击这里用firebug查看。
间距(spacing)
Web页面上的间距平时制作中对我来说最烦人了,每一个地方都城要去测量,这样一来有时并不标准,或多或少产生不同的视觉效果,你们说我是很SB的呀,看了这个后我才觉得原来间距定起来并不复杂,下面把常用的代码贴出来与大家一直分享一下:
				 /* ====== Default spacing ====== */
				h1, h2, h3, h4, h5, h6, ul, ol,dl, p,blockquote, .media {margin:10px;}
				h1, h2, h3, h4, h5, h6,img{padding-bottom:0px;}
				pre{margin: 10px;}
				table h1,table h2,table h3, table h4, table h5, table h6, table p, table ul, table ol, table dl{padding:0;}

				/* spacing helpers
				p,m = padding,margin
				a,t,r,b,l,h,v = all,top,right,bottom,left,horizontal,vertical
				s,m,l,n = small(5px),medium(10px),large(20px),none(0px)
				*/

				.ptn,.pvn,.pan{padding-top:0px !important}
				.pts,.pvs,.pas{padding-top:5px !important}
				.ptm,.pvm,.pam{padding-top:10px !important}
				.ptl,.pvl,.pal{padding-top:20px !important}
				.prn,.phn,.pan{padding-right:0px !important}
				.prs,.phs,.pas{padding-right:5px !important}
				.prm,.phm,.pam{padding-right:10px !important}
				.prl,.phl,.pal{padding-right:20px !important}
				.pbn,.pvn,.pan{padding-bottom:0px !important}
				.pbs,.pvs,.pas{padding-bottom:5px !important}
				.pbm,.pvm,.pam{padding-bottom:10px !important}
				.pbl,.pvl,.pal{padding-bottom:20px !important}
				.pln,.phn,.pan{padding-left:0px !important}
				.pls,.phs,.pas{padding-left:5px !important}
				.plm,.phm,.pam{padding-left:10px !important}
				.pll,.phl,.pal{padding-left:20px !important}
				.mtn,.mvn,.man{margin-top:0px !important}
				.mts,.mvs,.mas{margin-top:5px !important}
				.mtm,.mvm,.mam{margin-top:10px !important}
				.mtl,.mvl,.mal{margin-top:20px !important}
				.mrn,.mhn,.man{margin-right:0px !important}
				.mrs,.mhs,.mas{margin-right:5px !important}
				.mrm,.mhm,.mam{margin-right:10px !important}
				.mrl,.mhl,.mal{margin-right:20px !important}
				.mbn,.mvn,.man{margin-bottom:0px !important}
				.mbs,.mvs,.mas{margin-bottom:5px !important}
				.mbm,.mvm,.mam{margin-bottom:10px !important}
				.mbl,.mvl,.mal{margin-bottom:20px !important}
				.mln,.mhn,.man{margin-left:0px !important}
				.mls,.mhs,.mas{margin-left:5px !important}
				.mlm,.mhm,.mam{margin-left:10px !important}
				.mll,.mhl,.mal{margin-left:20px !important}
那么有产于Nicole Sullivan写的OOCSS的相关核心东西,我就介绍完了,逻辑不够清晰,希望对大家理解OOCSS有所帮助。如果你OOCSS感兴趣的话,或者你相知道如何创建基础对象的详细方法,可以看看Nicole Sullivan写的另一篇文章《How to create CSS objects? Get the granularity right!》或者点击下成的视频:
如需转载烦请注明出处:W3CPLUS


